Table of Contents
InfluxData is a platform for collecting, storing, visualizing and managing time series data. My particular interest in this platform stems from a lot of work that I had done a few years back in the RFID space. A time series database was the key to creating “Track and Trace” applications.
Since then, with the advent of hardware like Raspberry Pi, Arduino, Tessel and low cost sensors, it is straightforward to start collecting data. In most sensor systems, a time series database is again very useful since typically you will end up collecting a series of sensor data over time. For e.g. capturing the temperature every 5 minutes at a particular location. Replace temperature with your favorite sensor data if you want and you get the picture. While my requirement for time series data might be restricted to IoT and sensors, there are fairly wide ranging applications of a time series database. Check out the use cases that InfluxData has put up.
You always have the option to build out your own solution to capture this data. In addition to capturing data, you will need dashboards, raising alerts based on data values and more. It makes pragmatic sense to look at platforms that have been created to handle all of this and more.
At a high level, what you want from platforms like this, are some high level functional requirements like:
- Storing time series data with flexibility in the data schema to allow for more fields or tags moving forward.
- Collection or integration mechanisms to translate/push time series data from various sources into this single normalized database.
- Standard dashboards that allow for querying/visualization in the product itself. For most projects, this is sufficient unless you have custom requirements.
- Ability to define alerts on the data and notify users/applications.
There will definitely be more requirements but the above is a general list that would be expected from any such platform. In addition to the above, there could be cross cutting concerns like security, logs, etc. that would be a requirement too.
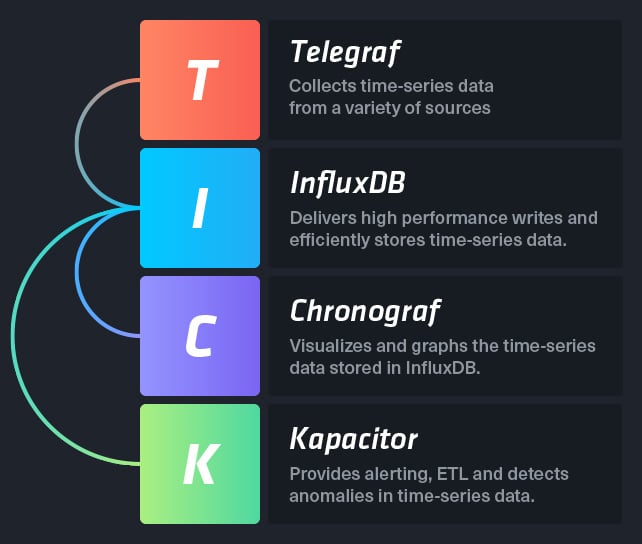
InfluxData caught my interest because it had elements (modules / applications) that addressed all the above points. It has the following modules, named TICK and I am reproducing the diagram from their official documentation:
This tutorial series will start off with InfluxDB first and get that up and running on the Google Cloud Platform. Once we get that in place, we will build out an IoT project with Arduino/Python and feed that data into InfluxDB. Then we could possibly look at some visualization and or alerts via other products in the TICK stack.
Part 1 : Get InfluxDB up and running on Google Cloud Platform
Google Cloud Platform - create a project
The first step is to create a project. Follow these steps:
- Visit Google Developers Console and login with your account.
- Click on Create Project. This will bring up the New Project dialog. Enter a name for the project and ensure that you have selected the correct Billing Account. An example screenshot is shown below:
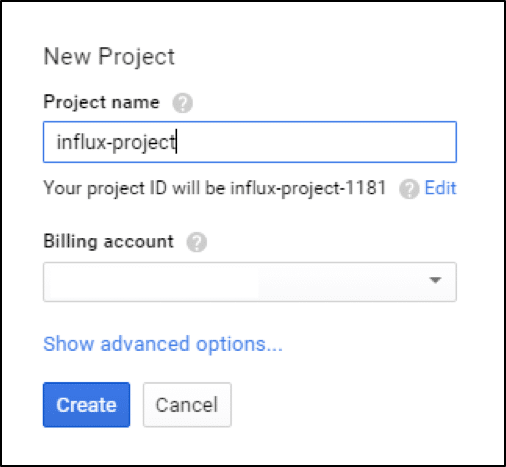
- Click Create to begin the process of creating the project.
Be patient while the project is being created and initialized.
Google Compute Engine - provision a virtual machine
We need to create an instance on which we can run InfluxDB. This means we need to provision a VM (Linux based) from the Compute Engine service.
Follow these steps:
- Click on Compute --> Compute Engine --> VM Instances.
- Click on New Instance.
- This will bring up a form for entering the details about your new instance. Pay attention to the following fields:
-
- Give your instance a name. For example, influxdb-1
- Select a zone closest to you. For example, us-central1-a
- Select a machine type. I went with the lowest option f1-micro
- Keep the boot disk image as the default one selected i.e. Debian
- Leave all the other options at their default.
- Click on the Create button.
Install InfluxDB and start InfluxDB server
The official documentation does a good job of providing instructions for installing InfluxDB on a variety of operating systems. Follow the steps given for installing InfluxDB on Debian.
To set up InfluxDB on our VM instance, we will need to SSH into the instance. Follow these steps:
- From the sliding menu on top, go to Compute --> Compute Engine --> VM Instances
- You will see your VM instance listed.
- Look out for the SSH button at the end of the row.
- Click that and wait for the SSH session to get initialized and set up for you. If all is well, you should see another browser window that will transport you to the VM instance as shown below:
 The next thing is to install InfluxDB and I reproduce the steps below from the official documentation:
First up, set the package manager:
curl -sL https://repos.influxdata.com/influxdb.key | sudo apt-key add -source /etc/os-release

test $VERSION_ID = "7" && echo "deb https://repos.influxdata.com/debian wheezy stable" | sudo tee /etc/apt/sources.list.d/influxdb.list

test $VERSION_ID = "8" && echo "deb https://repos.influxdata.com/debian jessie stable" | sudo tee /etc/apt/sources.list.d/influxdb.list
Then install and start the InfluxDB service:
sudo apt-get update && sudo apt-get install influxdb
sudo service influxdb start
Validate the InfluxDB server installation
You can now launch the client shell (influx) to validate that it is able to connect to the influxd daemon. The client shell is similar to various other shells that you might have used in databases like MySQL that let you interact with the database server.
Just type influx at the terminal and you should see an output that looks like this:
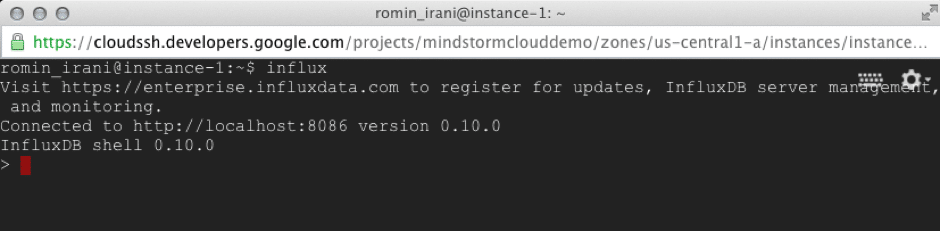
You should be at the influx shell prompt (>) and over here you can now start interacting with the InfluxDB daemon. Some of the common operations that you can do via the shell are creating databases, inserting data, querying data and more.
Note that the commands you provide in the shell are executed via API calls to the InfluxDB daemon that is running on the localhost on port 8086.
Create a database and test out some queries
Let us now create our temperature database in InfluxDB that will be used to capture temperature sensor values from multiple weather stations.
Our model is very simple for now. I have several weather stations (Arduino + temperature sensor) installed at various physical locations across the city of Mumbai. Each location is identified by a unique name, for e.g. S1, S2, S3 and so on. And each station captures temperature values every few seconds and that is what we will capture in InfluxDB.
InfluxDB has excellent documentation to get you started. You can refer to the docs for more details on the commands that I will be using in the next few sections. However, the commands are intuitive enough for you to follow along. (I also recommend reading the docs to understand the key concepts in the InfluxDB.)
So, let us go ahead and create the database first. We shall name the database temperature_db.
All the commands are fired from the InfluxDB Shell (>) that we have started earlier.
> create database temperature_db
>
This will create a database named temperature_db and we can verify that by firing the show databases command as given below:
> show databases
name: databases
---------------
name
_internal
temperature_db
>
Like any other database system, there could be multiple databases present and managed by the single InfluxDB Server, so we need to specify which database we want to work with. In our case, we are working with the temperature_db, so we select that via the USE statement.
> USE temperature_db
Using temperature_db
Now, we are all set to insert the data in a collection (measurement) of our choice. There are various ways of getting the information into the InfluxDB like the shell we are using now, agents and also the API. We shall be taking a lot at the others later on in the series but for now, we will use the current shell that we are logged into.
Since what we are measuring here is the temperature, we can call our measurement as ‘temperature’. In addition to each measurement, we can also specify:
- One or more key values. These are the values that are measuring and in our case it is the actual temperature value in degrees celsius. So we will have a single key-value, where the name of the key is value and its value will be the temperature in degrees celsius.
- Zero or more tags. For e.g. we will use a tag named station. Our station will have the values S1, S2, S3 and so on, depending on which station is sending the data.
The data to be inserted into InfluxDB uses the line format, the format of which is given below:
<measurement>[,<tag-key>=<tag-value>..] <field-key>=<field-value>[,fields..] [unix-nano-timestamp]For e.g. a measurement (temperature) from our station (S1) with temperature value 29.8 is as follows:
temperature,Station=S1 value=29.8Let us go ahead and insert some sample records. Fire the INSERT statements at the shell as given below:
> INSERT temperature,Station=S1 value=29.8
> INSERT temperature,Station=S1 value=29.9
> INSERT temperature,Station=S1 value=29.8
> INSERT temperature,Station=S2 value=29.9
Notice that we are not providing the timestamp, an important field. This is the Unix Timestamp and if we do not provide it, InfluxDB will populate it for us at the time of writing the record. For now, this is not provided but if you are working in offline mode and wish to capture the local timestamp then you should provide that rather than letting InfluxDB set that value. Note that timestamps can be up to nanosecond range.
We can now query for the records via the the SELECT statement. I am showing some sample SELECT statements but the possibilities for querying in multiple and unique ways is available in InfluxDB.
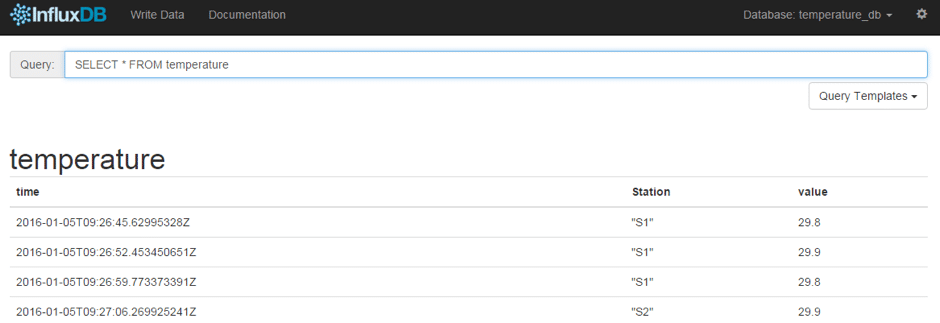
> SELECT * FROM temperature
name: temperature
-----------------
time Station value
1451986005629953280 S1 29.8
1451986012453450651 S1 29.9
1451986019773373391 S1 29.8
1451986026269925241 S2 29.9
>
Try out some queries with WHERE clause. If you have used any SQL like database before, this should be straightforward.
You can come out of the InfluxDB shell via the exit command.
Setup Google Compute Engine firewall rules
InfluxDB comes with a handy administrative web application that you can use to manage databases, insert records, execute queries and more. We could have used that in the previous section, but I believer it was important to understand the shell too.
Another reason was to demonstrate how still have some work to do on Google Compute Engine so that we expose the right ports via which we can then access the InfluxDB admin web app from anywhere outside.
The first thing to note is a configuration file influxdb.conf. This file is present in /etc/influxdb/influxdb.conf
We are particularly interested in accessing two services from outside:
- InfluxDB admin web app: As explained above, we would like to access the web application from anywhere.
- InfluxDB API: This is important so that we can write external programs that could directly talk to the API from outside of Google Compute Engine.
If you go through the influxdb.conf file, you will find that there are 2 ports that are used by it, namely 8083 (InfluxDB admin web app) and 8086 (API).
So what we need to do is to enable firewall rules for your Google Compute Engine instance to allow traffic to these ports from outside. In summary, we need to enable these ports on the Compute Engine instance network and we do that by adding a firewall rule as shown below:
- Go to the Google Developers Console for your InfluxDB project.
- From the sliding menu on top, click on Networking --> Firewall rules.
- Click on Create a firewall rule.
- This will bring up a form to create a firewall rule wizard. Take a look at the expected values given below:
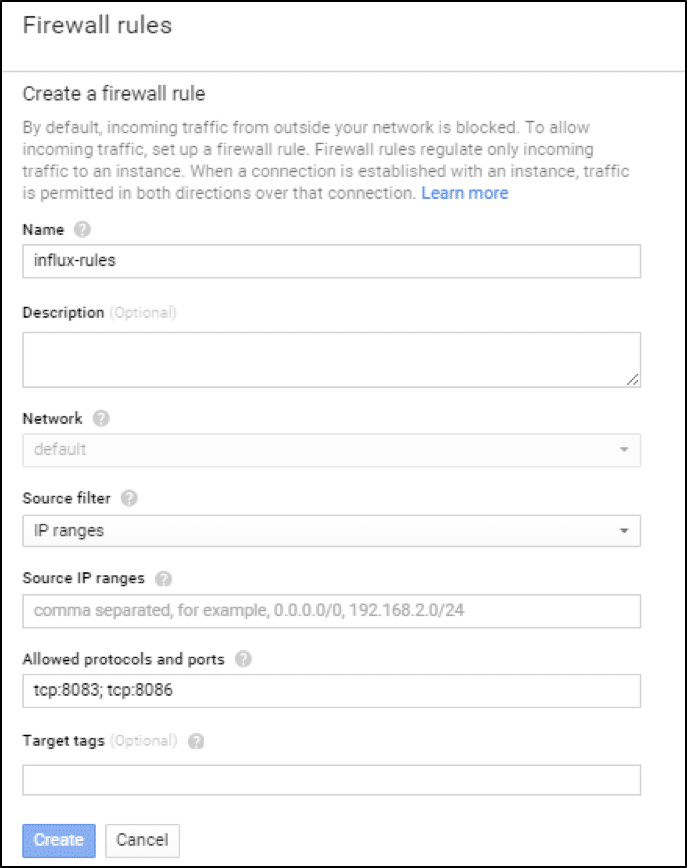
- Note that you can name the firewall rule anything, but make sure that the source IP range i.e. from where should this be accessible opened up for anyone. And the port on which traffic is to be allowed is 8083 and 8086. Leave the network as default.
- Click on Create button to create the rule.
This will enable access from outside traffic on the ports 8083 and 8086.
Access the admin interface from outside
We can now access the Admin interface from any machine outside the Google Compute Engine network.
You can access the Admin interface at:
http://<public-ip-influxdb-instance>:8083To find out the public IP address that is given to your Google Compute Engine instance running InfluxDB, do the following:
- From Google Developers Console, go to sliding menu on top, Compute ? Compute Engine ? VM Instances.
- In the list of VM instances, locate the VM instance in which you are running InfluxDB. You will find that one of the columns is External IP. This is the public IP address of your Compute Engine instance.
Use that address to access the Admin interface at:
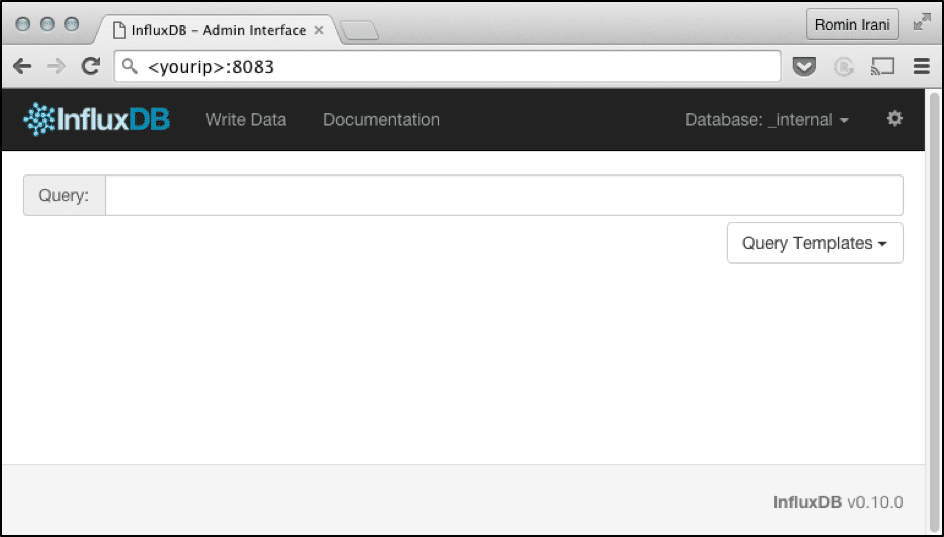
http://<public-ip-influxdb-instance>:8083You should see an Admin interface as shown below:
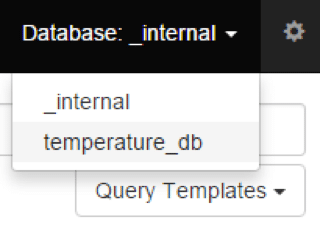
Click on the drop down in the top right named Database and you should see the temperature_db database that we created as shown below:
Select the temperature_db database and fire the query to select all records as shown below:
Authentication and authorization
We have currently not setup any authentication/authorization for our InfluxDB Instance. This is definitely not recommended but for the purpose of this tutorial, I wanted to keep it simple. However, do note that you can set up users and the operations that they are authorized to perform in InfluxDB. Users can have roles based on access control to specific databases too. The steps are straightforward and can be found in the docs.
What's next?
- This completes the first part of the tutorial on setting up InfluxDB hosted on Google Compute Engine. In Part 2 we'll look at using the API to insert data into InfluxDB and also how to integrate with an Arduino/Python client. Follow us on Twitter @influxdb to catch the next blog in this series.
- Looking to level up your InfluxDB knowledge? Check out our economically priced virtual and public trainings.
