Using Azure Blob Storage for InfluxDB 3 Core and Enterprise
By
Heather Downing /
Developer
Mar 20, 2025
Navigate to:

Introduction
InfluxDB 3 Core and Enterprise introduce a powerful new diskless architecture that lets you store your time series data in cloud object storage while running the database engine locally. This approach offers significant advantages: you get the performance of a local database combined with the durability, scalability, and cost-effectiveness of cloud storage.
In this tutorial, I’ll show you how to set up InfluxDB 3 Core or Enterprise with Azure Blob Storage as your object store. This configuration is ideal for scenarios where you want persistent storage without managing physical disks, need to access your data from multiple locations or require a more resilient backup strategy.
Prerequisites
Before getting started, you’ll need:
-
InfluxDB 3 Core or Enterprise installed on your local machine (but don’t run it yet)
-
An Azure account with access to create storage resources
-
A terminal or command prompt with the necessary permissions (super user/admin)
Set up Azure Blob Storage
First, we need to set up an Azure Storage account and container to store our InfluxDB data:
-
Create an Azure Storage account:
-
Navigate to the Azure Portal and sign in (requires a subscription and a resource group).
-
Create a new Storage account with “Blob storage” as the storage type.
-
Under Advanced, make sure a “Hot” access tier is selected for optimal performance.
-
Note your storage account name (e.g.,
influxdb3blobstorage) and select “Go To Resource.”
-
-
Create a container:
-
Within your storage account, create a new container (e.g.,
influxdb3-data). -
This container will store the WAL or Parquet files which InfluxDB 3 writes data to.
-
-
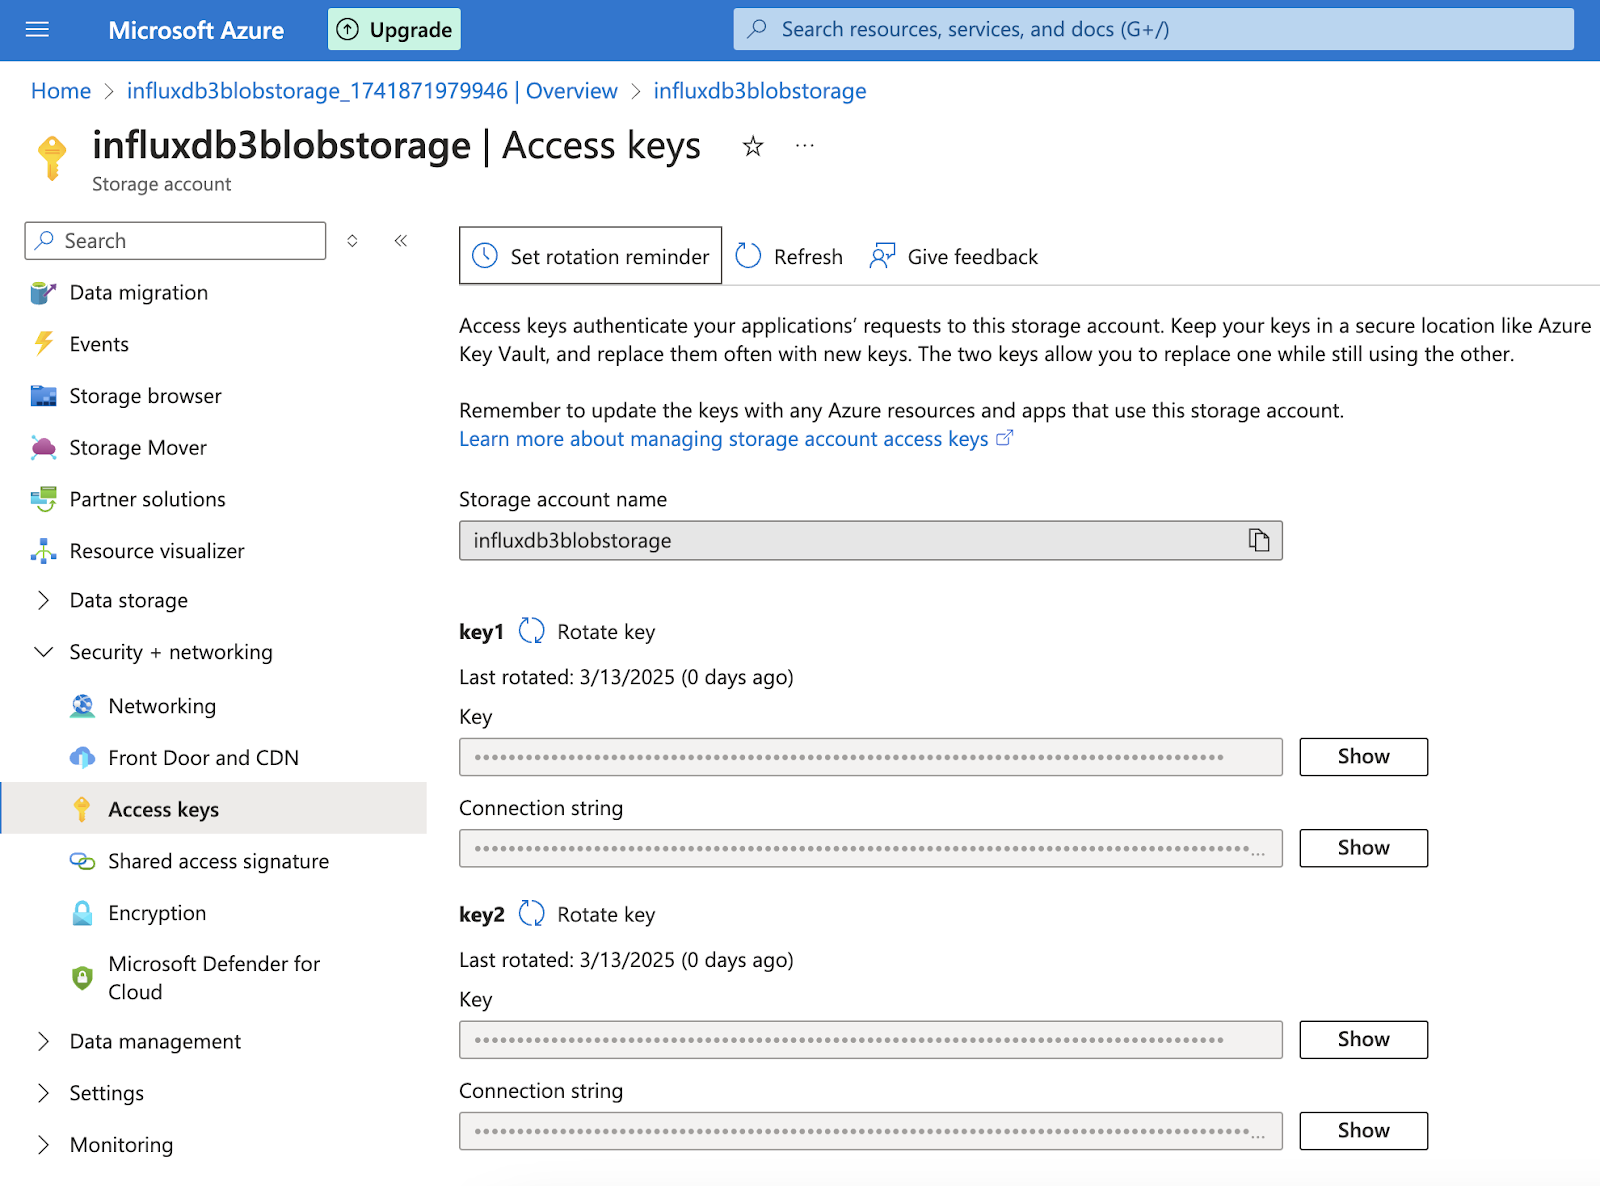
Get your access credentials:
- From your storage account, obtain the storage access key which you’ll use to authenticate InfluxDB with your Azure Blob Storage.
- Expand “Security + networking” on the left-hand menu of the storage account (not the container).
-
Select “Access Keys.”
- Copy one of the keys (not the connection string) to use for InfluxDB3.

Start InfluxDB with Azure Blob Storage
Now that you’ve set up Azure Blob Storage, you can configure InfluxDB to use Azure as an object store. You can store your access key in an environment variable for better security.
-
Open your terminal.
-
Navigate to where InfluxDB 3 was installed (you have to set your source in order to run it).
-
Replace the values in the config below with your Azure access key, storage account name and bucket (container) name and run the following:
NOTE: The CLI serve examples below are for Enterprise and include the following parameters not needed for InfluxDB 3 Core:
- cluster-id
- mode
influxdb3 serve \
    --object-store=azure \
    --node-id=azure01 \
    --cluster-id=cluster01
    --azure-storage-access-key="YOUR_ACCESS_KEY" \
    --azure-storage-account=influxdb3blobstorage \
    --bucket=influxdb3-data
Replace the placeholder values with your Azure storage account name, access key, and container name. The access key should be set inside of a string in quotations.
Write and query data
Once your InfluxDB instance is up and running with Azure Blob Storage, you can write and query data as you normally would. You can interact with your data in several ways, including language client SDKs, API, Telegraf, or CLI. You can use third-party visualization tools as well to read the data.
The database engine runs on your local machine, while Azure provides persistent storage. Since this is a schema-on-write database, you can declare the database name when you write to it. Keep in mind the number of databases, tables and columns available for Core and Enterprise licenses when you craft your commands (for example, only one node is available for Core).
NOTE: Open a separate terminal window for your write/query commands to not interrupt the database engine while it’s running in your original window.
Here’s an example of using the CLI to write data (with line protocol syntax):
influxdb3 write --database=testdb "
cpu,host=prod-server1,region=us-west
usage_percent=88.2,memory_gb=31.8,disk_used_percent=71.3 1739578205959259001
cpu,host=prod-server2,region=us-east
usage_percent=87.4,memory_gb=62.1,disk_used_percent=78.9 1739578205959259002
"
Upon success, go to your Azure container to see the file system containing your new WAL file:
influxdb3-data > azure01 > wal > 00000000001.wal
 And to query that data using SQL:
influxdb3 query --database=testdb "SELECT * FROM cpu LIMIT 10"You should see:

How InfluxDB uses Azure Blob Storage
When InfluxDB receives write requests, it processes them through the following flow:

-
Incoming writes are validated, then data is buffered in memory.
-
Every second (configurable), the write buffer’s contents are flushed to Write-Ahead-Log (WAL) files in object storage (such as your Azure Blog Storage container).
- Data moves to a queryable in-memory buffer, where it’s available to incoming query requests.
- Approximately every 10 minutes, the contents of the queryable buffer are persisted to Parquet files in your Azure Blob Storage container.
This architecture means:
- Your most recent data is served from memory for fast access
- Data is persistently stored in Azure Blob Storage
- You get durability without the overhead of managing local disks
- With InfluxDB3 Enterprise, you get compaction and cheaper storage costs
Multi-node setup with Azure Blob Storage (Enterprise)
One of the powerful features of InfluxDB 3 Enterprise is the ability to set up high-availability clusters. With Azure Blob Storage as your Object store, you can configure multiple nodes to read and write to the same storage:
NOTE: InfluxDB 3 Enterprise Clustering
In InfluxDB 3 Enterprise, a cluster is a group of nodes sharing the same object storage that work together to provide high availability and workload distribution. Each node in the cluster requires a unique --node-id while sharing a common --cluster-id. For compaction management, run one node in compact mode to process WAL files into optimized Parquet files. Ingest nodes write data to the object store in their own directories, while compaction nodes consolidate and optimize this data for efficient querying. This separation lets you scale write operations independently from compaction processes, improving overall system performance.
- The
--cluster-idparameter is required for all new InfluxDB 3 Enterprise instances and must be different from any--node-idin the cluster. - Only one node can be designated as the Compactor.

A basic Enterprise example:
# Node 1
influxdb3 serve \
--node-id=azure01 \
--cluster-id=cluster01 \
--mode=ingest,query,compact \
--object-store=azure \
--azure-storage-account=influxdb3blobstorage \
--azure-storage-access-key="YOUR_ACCESS_KEY" \
--bucket=influxdb3-data \

# Node 2
influxdb3 serve \
--node-id=azure02 \
--cluster-id=cluster01
--mode=ingest,query \
--object-store=azure \
--azure-storage-account=influxdb3blobstorage \
--azure-storage-access-key="YOUR_ACCESS_KEY" \
--bucket=influxdb3-data
This provides resilience: if one node fails, the other continues to operate with full access to all data stored in Azure.
Who should consider this
Using Azure Blob Storage with InfluxDB 3 gives you the best of both worlds—the performance of a local database engine with the durability and scalability of cloud storage. Your queries remain fast (especially when querying recent data) while your data stays safe in the cloud.
This configuration is particularly valuable for:
-
Organizations with existing Azure infrastructure
-
Applications requiring high durability without complex local storage management
-
Multi-region deployments where data needs to be accessible from different locations
-
Cost-effective long-term storage for time series data
We hope you’ve found this tutorial helpful! Please share your experiences using InfluxDB 3 with Azure Blob Storage in our community forums or Slack channel.
Download Core or Enterprise to get started. Check out our Getting Started Guide for Core and Enterprise, and share your feedback with our development team on Discord in the #influxdb3_core channel, Slack in the #influxdb3_core channel, or our Community Forums.
